ICC Guide
![]()
Table of Contents
- Introduction
- Download and Install the Printing Utility
- Printing Setup
- Print a Test Target Image
- Purchase the Appropriate Custom Profile Package
- Print the Target Image
- Instructions to Send the Target Images or the Target Prints
- Appendix - Epson Print Driver Menus
Introduction
Congratulations! You’ve taken the next step in perfecting your sublimation printing process! Creating a custom ICC profile is the best way to ensure that your printer is creating a print with a quality image. We recommend that you print out the checklist from our Downloads page, to make it easier to complete these steps.
You’ll need to carefully follow the steps outlined in this document to print out our “Target Images” so that the “Target Prints” can be pressed onto your specified blank. This Target Print is used to create a custom ICC profile which will capture the baseline of your printer’s characteristics along with the ink, paper and substrate, giving you a custom profile.
There are two options for the profiling service:
Option #1: You Press the Target Images onto Blanks
The best results come from you printing and pressing like you would in your normal workflow. You’ll download the files, print them using the instructions supplied and then press them onto your blanks.
Option #2: The Peridot Pig Presses the Target Images onto Blanks
Use this option if you are mainly printing mugs, tumblers, hardboard panels or other odd shapes. We can’t profile on curved surfaces so we use blanks that are close to the profile of mugs and tumblers. You will still download the files and print them using the enclosed instructions.
You MUST follow the steps in this document to avoid problems with the profiling. If you have any questions, please contact us at Support@thePeridotPig.com . We recommend that you print out this document and/or the checklist to ensure you’ve completed all of the steps for proper profiling.
The most difficult part of this process will be to print the Target Image(s) without any color management from your software or printer driver. These distort the results of the printer profiling process. You will also want to have your printer in good working state with the proper drivers before printing.
Before we get started:
- DO NOT open the Target Images in Photoshop, Elements, Lightroom, Aperture, Preview, Gimp, etc. You run the risk of changing the color profiles.
- Each of the following sections will have a checklist for you to complete. We recommend that you print this document and use it to ensure you complete all the necessary steps.
- Make sure you have completed the ICC Guide steps from the checklist on our download page.
Printer Maintenance
Before you print the Target Image, we’ll want to make sure your printer is in an optimal state. Use the check list below to make sure each item is covered. Instructions are provided for each step.
- Verify the printer driver version
- Check ink supply levels
- If needed, upgrade to the latest print driver and fill your ink cartridges
- Check the Print Head Alignment
- Perform a Nozzle Check
- If needed, perform a Head Cleaning
- Load the paper you intend to use for the custom profile
Verify the Printer Driver Version
If you already notice that you have problems with the basic CMYK colors, the first thing to check is your printer driver. Check your printer’s manufacturer website and download the latest version of your printer driver. Don’t rely on the version that came with the printer. If you are having color problems, you should first try to uninstall the driver and reinstall the latest version.
Mac Users: Apple and Epson don’t always play well. You’ll need to ensure that you don’t have the Apple AirPrint driver installed instead of the Epson OEM driver. The AirPrint driver CANNOT be used to print the Target Images and will not work properly with any selected ICC profiles.
We also recommend that you do not use your printer wirelessly. Even though you have installed and selected Epson drivers, you may not get the full functionality and may not fully switch off “Printer Color Management”. Invest in a USB cable and connect to your printer for creating your sublimation prints and the Target Image in this process.
Windows Users - Instructions to verify your printer driver:
- From the “Start Menu”, type in “control panel” and click on the “Control Panel” app
- On the top right under “View By”, click the triangle and select “Category”
- Then under “Hardware and Sound”, click “View devices and printers”

- Select your sublimation printer from the list, right click to select “Printer properties”

- On the pop-up menu, select the “Version Information” tab

- Note the version shown and verify that it is the latest driver from the printer manufacturer’s website.
- If needed, follow the manufacturer’s instructions to upgrade your driver to the latest version.
Mac Users - Instructions to verify your printer driver:
- Go to “System Preferences” and open “Printers & Scanners”
- Select your sublimation printer from the list of printers shown
- Click the “Options & Supplies…” button
- Under the “General” tab, you should see your Device Name and the Driver Version
- If you see “AirPrint” on this page, you’ll need to switch to the latest OEM driver for your model. Visit the Trouble Shooting guide to resolve this issue. We cannot make a working custom profile if you are using AirPrint.
Mac Users - Instructions to install the latest printer drivers:
- Download the latest driver software from the Epson support site. DO NOT download from Apple. Save a backup copy of your download.
- Return to the “System Preferences” -> “Printers & Scanners…” menu and delete all the existing versions of your sublimation printers. Select each and use the “-“ (Minus sign) to remove them.
- Remove all Epson printing applications and utilities from the “Applications” folder on your Mac.
- Install the new Epson driver package that you downloaded
- Connect your printer using the USB cable and turn it on
- Return to the “System Preferences” -> “Printers & Scanners…” menu and add a new printer using the “+” (Plus sign). You may have to wait a few minutes for the software to detect the printer and for all the drivers to appear. Some of these may be the Apple or AirPrint drivers. Wait for the correct driver to appear and select it.
Check the Ink Levels, Head Alignment & Nozzle
Windows Users - Instructions to verify your ink levels:
- From the “Start Menu”, type in “control panel” and click on the “Control Panel” app
- On the top right under “View By”, click the triangle and select “Category”
- Then under “Hardware and Sound”, click “View devices and printers”

- Select your sublimation printer from the list, right click to select “Printing preferences”
- When the menu opens, click on "Ink Levels"

- Verify that all ink levels are high enough to print numerous color charts

Mac Users - Instructions to verify your ink levels:
- Go to “System Preferences” and open “Printers & Scanners”
- Select your sublimation printer from the list of printers shown
- Click the “Options & Supplies…” button
- Select the “Supply Levels” tab
- Verify that you have sufficient ink levels to print out the Target Images. If you’re getting low, fill up your inks before starting.
Instructions to perform a Print Head Alignment:
We’ve included the instructions for our Epson WF-7720 and it should be similar to other models. Consult your printer manual if you have a different printer model.
- Load a few sheets of regular copy paper and make sure there are no errors or notices on the main display
- Go to the “Maintenance” menu and select “Print Head Alignment”
- Select “Vertical Alignment” to start
- Follow the on-screen instructions to print the alignment sheet. DO NOT cancel printing while you are printing the head alignment patterns.
- Complete the vertical validation and then repeat the steps and perform the same check for “Horizontal Alignment”.
Instructions to perform a Print Head Nozzle Check:
- Load a few sheets of regular copy paper and make sure there are no errors or notices on the main display
- From the “Maintenance” menu, select “Print Head Nozzle Check”
- Select “Start” and allow the pattern to print.
- Check the pattern:

- If there are no gaps and the image looks like the one on the top, select “O”
- If there are ANY gaps or the pattern is faint, select “X” to continue
- Follow the instructions to clean the print head. DO NOT attempt to print the Target Image if there are print nozzle issues. Those issues must be resolved before profiling.
Instructions to perform a Print Head Cleaning (only if needed):
- Load a few sheets of regular copy paper and make sure there are no errors or notices on the main display
- From the “Maintenance” menu, select “Print Head Cleaning” or continue from the failed Print Head Nozzle Check
- Select the appropriate option based on how your Nozzle Check looked. In the example above, you would select “All Colors”
- Select “Start”. DO NOT cancel printing, open the front cover or turn off the machine while you are cleaning. You might not be able to print.
- When the cycle completes, you’ll be prompted to perform another Nozzle Check. Select “Yes”.
- Select “Start” to print the Nozzle Check pattern. If it looks good, you’re all done. If there are still gaps, check your manual on how many times you can execute the cleaning cycle before having to let it rest. For some models, you can only clean the head 3 or 4 times before needing to let the printer rest for 6 – 12 hours.
Finished with the checklist above?? Great! You’re now ready to set up your system to print the Target Image.
Download and Install the Printing Utility
The hardest part of creating a good baseline Target Image, is getting the Color Management software disabled. This is especially hard on a Mac computer. You CANNOT use any software like Photoshop, Gimp or even the Mac Image Viewer to do this reliably.
The easiest solution is to use the free Adobe Color Printer Utility (APCU) from Adobe’s website or our download page. It does not require that you use Photoshop or any other Adobe products.
Mac Users - Note the Adobe site says that ACPU is no longer supported on MacOS Catalina 10.15 or later but it DOES still work.
You can also use one of the following applications, which are the ONLY other applications that will work:
- QTR Print-tool (Mac only)
- Qimage One
Windows Users - Instructions to download and install ACPU:
- To install ACPU, download the ACPU.zip file
- Double click on the .zip file
- Choose to extract all the files.
- After the extraction is complete, drag the Adobe Color Printer Utility to the “Programs” folder or your preferred folder.
Mac Users - Instructions to download and install ACPU:
- To install ACPU, download the appropriate ACPU installation file
- Double click on the file to unzip it.
- Double click the resulting .dmg file.
- If you get a security warning since the file was not downloaded from the App Store, go to your “System Preferences” and select “Security & Privacy”. Under the “General” tab, you should be able to allow the ACPU file to be opened.
- Drag the “Adobe Color Printer Utility.app” file to your “Applications” folder
Printing Setup
Before you purchase an ICC profiling package, please download the Target Images, and ensure that you’re able to print them correctly. The Target Images are available for free on our downloads page. Note that the Target Images will vary based on the substrate you are profiling. “Soft” substrates like t-shirt material or fabric will use the Basic Target Images. Gloss and hard substrates like aluminum, ceramic, textured canvas will need the Advanced Target Images. Please contact us if you have questions on which images to use.
We’ve also included our recommended settings for sublimation printing. Ensure these options are reviewed. Even without a new ICC profile, they will improve your sublimation print quality. You may have to experiment to find the right combination of settings for each substrate. Save and label each of these print setting combinations as a Preset so that you can match it to your custom ICC profile.
Sublimation Printing Recommendations:
- Use the correct weight of paper. You should have a profile for different paper weights, manufacturer and substrate combinations:
- 125g paper for heavily saturated prints
- 120g paper for medium/slightly heavy prints
- 105g for fine print and light/medium saturation.
- Don’t use the “plain paper” setting in your Print Settings. It can introduce additional color management and should only be used when you’re printing on regular copy paper. For sublimation, use “High quality plain paper”, “Epson Matte” or “Premium presentation matte”.
- Under “Print Settings” -> “Print Quality”, select “Fine” or “Quality”. Using “Quality” might give you too much ink saturation depending on your paper type and how well it absorbs the ink.
- Turn off high-speed printing
Windows Users - Instructions for setting up a test print:
- Download the Target Images and unzip the file
- Download the Color Printer Test Page (color-printer-test-page.jpg) file and print it using your normal software and settings. Remember to mirror the image
- Press the test page onto a piece of white substrate. This will be your “before” image.
- Download the Adobe Color Printer Utility (ACPU) and unzip the file
- Read the readme file and when ready, double click the .exe file
- Select “File” -> “Open…” and choose one of the Target Image .tif files

- Click “Open”

- The image preview will appear. Select “Print Setup…”
- Select the correct orientation (should be “Landscape”). Make sure to select “Letter 8.5” x 11” 22x28cm”. You may need to adjust the margins if the page does not fit.

- Select OK to return to the image preview menu
- Then select the “Print…” button and select “Properties…”

- Click the “More Options” tab
- Under “Color Correction”, select the “Custom” radio button to enable the Advanced options

- Select “Advanced…”
- On the “Color Correction” menu, select “No Color Adjustment”

- Select “OK”
- Back on the “More Options” tab, turn off “High Speed” and turn on “Mirror Image”

- Save this configuration as a preset, select “Add/Remove Presets…”
- Give the preset a name (we used “CustomICCProfile”) and click “Save”

- Close the preset menu
- You’re now ready to create a test print. Select “OK”

Mac Users - Instructions for setting up a test print:
- Download the Target Images and unzip the file
- Download the Color Printer Test Page (color-printer-test-page.jpg) file and print it using your normal software and settings. Remember to mirror the image
- Press the test page onto a piece of white substrate. This will be your “before” image.
- Open the Adobe Color Printer Utility (ACPU)
- Select “File” -> “Open…” and the first Target Image .tif file
- Select “File” -> “Page Setup…” and select the correct orientation (Landscape or Portrait). It should say “Scale” is at 100%. Click “OK”

- Select “File” -> “Print…” but don’t press “Print” yet!

- Open the “Advance Setting” by clicking the “Show Details” button.
- Confirm that you have the correct Printer model selected.
- Select each of the center dropdown menus and check the following settings. The names will vary by model, but you should see menus similar to “Layout”, “Print Settings”, “Quality & Media”, “Color Matching”, “Paper Handling”, etc.
- SCALE: make sure that the image is printed at 100%. DO NOT select “Expand to Fit” nor “Scale to fit paper size”.
- Paper or Media Type: Select the items that you’ll be using with this profile and matches your chosen paper. You must select the appropriate “Media Type” and “Print Quality”
-
Color Matching: All the options should be grayed out. If your printer model has “Advanced Color Settings”, the “Color Settings” should be grayed out and say “Off (No Color Management)”.

-
Print Settings: Select “Mirror Image"
- Save these settings as a preset and/or write them down. You’ll want to use the same configuration with your new custom ICC profile. These same settings should be used with each of the Target Images.
Print a Test Target Image
You’re now ready to print your first Target Image file. We recommend doing this step before making the purchase. If you have problems with the verification, please contact us before you buy a profiling package.
- Print one of the Target Image .tiff files. Make sure the image is mirrored!
- Inspect the Pre-Profile Colors using the criteria below:
- At the top of each Target Image file, you’ll find the following graphic with color swatches. Inspect each Target Print and Target Image to make sure they are clear and crisp

- The colors should be solid and clean with no bars or “pizza wheel” marks
- Patch 1 Blue – should be a solid dark blue
- Patch 2 Cyan – should be solid cyan with no magenta or yellow dots
- Patch 3 Green – should be somewhat dark and not a light green
- Patch 4 Yellow – should be solid yellow with no cyan or magenta dots
- Patch 5 Orange – should have no cyan dots
- Patch 6 Red – should have no cyan dots
- Patch 7 Magenta – should be solid magenta with no cyan or yellow dots
- Patch 8 Dark Gray – will be slightly lighter than the black
- Patch 9 Black – should be solid black

- If the colors look correct, then move onto the next section
- If the colors do not look correct:
- Windows Users – The problem is usually due to Color Management (ICM) being left ON somewhere in the printer driver settings. ACPU (or any other application) cannot turn off Color Management in the print driver, so you must always verify the driver settings to confirm it is OFF
- Mac Users – The problem is normally because the AirPrint driver is still being used. If you have an older printer, it might be that color management is still turned on in the print driver. It could also be that the Target Images were opened in Photoshop, Gimp, etc and were converted to a color profile.
Purchase the Appropriate Custom Profile Package
We recommend that you start with a basic sublimation ICC profile package. The basic package will require you to print your Target Images onto pieces of white, 100% polyester fabric. You can provide your own fabric, but it must be 100% polyester without any coating or treatment. You will need to print the pages on 8.5” by 11” white blanks. If you’d like to purchase the substrate material, you can include that with your purchase, and we’ll send you the material in the appropriate size.
NOTE: Make sure you test print a Target Image before making your purchase!
NOTE: Make sure you include your email address in your order so that we can send you final instructions and your Custom ICC Profile!
Visit our website to review the different Custom ICC Profile Packages we offer. Not finding the combination you need? Contact us at support@ThePeridotPig.com .
Print the Target Image
After you have purchased your Custom ICC Profile package, you’ll receive an email with instructions regarding the number of images that will be required to create your ICC profile. At minimum, seven Target Images are required to create the Target Prints for sublimation print profiling.
You’ll want to use the same printer settings that were saved out of the “Setup and Test Print the Target Image” exercise. You’ll also need a heat press and substrate large enough to press the Target Print. You should use the exact paper, ink, and substrate that you’ll be using in your regular sublimation production process. If you have different sized material or a specialty substrate, please contact us support@ThePeridotPig.com .
Instructions to print the Target Image:
- Download the .zip file specified in your Custom ICC Profile purchase email
- Unzip the file and save the image .tif files to a folder that you can locate
- Open the Adobe Color Printing Utility (ACPU)
- Click “File” -> “Open…” and select the first downloaded file
- Verify that the page setup and print setting are still as specified in “Setup and Test Print the Target Image” section
- Print the first image
- Inspect the pre-profile colors at the top of the page. If they look good, continue with the remaining files in the Target Image package. If the colors do not look correct, revisit the “Setup and Test Print the Target Image” section and confirm all your settings are correct. If all your settings are correct and you are still having issues, read through our Trouble Shooting guide.
- Inspect the print to ensure all the color patches are on the page and the image has not been resized
- Allow all the Target Images to dry overnight
- After the Target Images are completely dry, press each of the Target Images to the specified substrate using your ink and paper manufacturers recommendations. If you don’t have that information, these are the suggested time, temperature, and pressure settings:
Substrate
Time
Temperature
Pressure
100% Poly Fabric
400° F (204° C)
50 – 70 sec
Light
Poly Duck Canvas
400° F (204° C)
50 – 70 sec
Light
Hardboard
400° F (204° C)
90 sec
Medium
Aluminum
400° F (204° C)
55 – 70 sec
Light
Scuba Foam
400° F (204° C)
50 - 90 sec
Medium
Tile
400° F (204° C)
6 min
Medium
- Inspect each print to ensure there are no flaws
- Add your name and order number to the Target Prints using a permanent marker making sure not to write on any of the color images.
- Complete the order form that was included in the download package. Make sure to include your name, email address and order number on the form.
- Package your Target Prints along with your order form and send to The Peridot Pig at the following address:
The Peridot Pig
Attn: ICC Profiling Department
11395 Normandy Lane
Chagrin Falls, OH USA 44023 - Make sure you do not write on the Target Print images or put any stickers or labels on the back.
- Label the envelope/package with “DO NOT BEND” on the front.
- If you are including hardboard, aluminum, or tile panels, make sure they are carefully wrapped and secured from damage. Place plain paper between the prints so that they do not get scratched or damaged during shipment.
Using Your New Custom ICC Profiles
After we receive your Target Prints, we’ll scan the images and create a custom ICC Profile(s) per your order. The profile will be emailed to you from Support@ThePeridotPig.com . Your file will be named using the following format:
<Initials>_<Ink>_<Paper>_<Substrate>_<Printer>.icc
Windows Users - Instructions for Installing Your New Profile(s):
- Download the profile from your email
- Once downloaded, move the file to the system folder on your computer where all your profiles are stored. You should be able to right-click the .icc profile and then select “Install Profile”.
Otherwise, the location will depend on what version of Windows that is running:
- Windows 98/ME
C:\Windows\System\Color\
- Windows XP/Vista/7/8/10/11
C:\Windows\System32\Spool\Drivers\Color\
Mac Users - Instructions for Installing Your New Profile(s):
- Download the profile from your email
- Copy the file to the profile directory: HD/Library/ColorSync/Profiles/
To find your Macintosh HD navigate to “Go” on the menu bar while the desktop is selected in a Finder window. Click on “Computer”. From there click “Macintosh HD” (or similar if you renamed your hard drive) - Make sure to keep a backup copy of your file
Photoshop Users - Printing with Typical Epson Printers:
- You must use software that allows you to override the printer color management software by selecting your new custom ICC profile. Typical programs like Photoshop, Illustrator, Gimp, etc. allow you to select the color profile. We’re providing the instructions for printing from Adobe Photoshop and your settings should be similar.
- We recommend that your working color space is ProPhoto RGB to give you the maximum color depth in your prints. In Photoshop, set your color preferences by going to “Edit” -> “Color Settings…”

- When you’re ready to print, select “File” -> “Print…” to bring up the print dialog box.
- Check that the “Printer:” setting is set the correct printer
- We’ll cover “Print Settings…” in the next step

- Under Color Management, change the “Color Handling:” selection to “Photoshop Manages Colors"
- Under “Printer Profile:”, select the new ICC profile that you installed in the prior section.
- Under “Rendering Intent:”, select the one that best suits your design. We normally use “Perceptual” or “Relative Colorimetric”. Use the one that gives you the best results.
- Depending on your ink brand, you may need to deselect “Black Point Compensation”. If your ink doesn’t have this information, keep it checked.
- Now select the “Print Settings…” button under the “Printer Setup”. The “Print Settings” vary by print driver and model. See the appendix on typical Epson printer menus.
- Check that the correct “Printer:” is set
- Select the preset that you made before, if applicable
- Once you’ve verified the settings, select “Save” and you’re ready to print the “after” test file.
- Under “Rendering Intent:”, select the one that best suits your design. We normally use “Perceptual”
- Depending on your ink brand, you may need to deselect “Black Point Compensation”. If your ink doesn’t have this information, keep it checked.
- Once you’ve verified the settings, select “Save” and you’re ready to print the “after” test file.
Comparing the Before and After Color Printer Test Page
We suggest that you print a “before” image and an “after” image to see how your new ICC profile performs. If you don’t see a noticeable difference, review our Trouble Shooting guide or contact us.
- Print the color-printer-test-page.jpg file using your new profile.
- Press it onto the same substrate like you did for the “before” image.
- Align the images side-by-side and use the following criteria to assess your new profile:


- A smooth transition from black to gray to white. The “before” image has slight greens and purple tones.
- The gray squares allow you to see any tonal shifts away from pure gray
- The gamut gradients show up any banding as well as any issues with color accuracy – you should check that the red, green, and blue are pure. Most printers may show some banding, so this isn’t a problem unless severe, or there is an inversion, where brightness shows variable levels as the color gets more saturated. The “before” image had banding in the blue ramp.
- The RGB squares should show good separation between colors with no bleeding into adjacent squares.
- Use these four images to check skin tones. Watch out for the image being too yellow, green, or blue. The “before” image is very blue toned making the people look “washed out” and gray.
- The rock arch has a slightly cyan sky, deep shadows, and the bright orange rocks.
- The yellow trees show a lot of fine detail and have bursts of bright yellow and orange color.
- The electronics image is useful for shadow detail.
- The strawberries help to see if red is printing properly. It’s always easier to look at a real object to see if it looks accurate. The light reflection really pops in the “after” image.
- The sunset image has a high saturation and will let you know if you have banding issues.
- The lava rock has a lot of shadow detail and a bronze highlight. It shouldn’t look too green or yellow.
- Finally, the center black and white image displays a full range of gradient tones from black to white. It shows you how well your grays are printing a real image.
Appendix – Epson Print Driver Menus
Applying the print settings will vary depending on the printer model. Below are some common Epson Driver layouts:
Windows - Type 1
- On the “Main” tab, select the appropriate media type and quality setting for your print.
(For sublimation, avoid using Plain Paper and select High Quality Plain Paper or Matte paper instead. Set the “Quality” to one of the two highest settings). - Select the tab labeled “More Options”
- Set “Color Correction” to “Custom” to enable the “Advanced...” button
- Click on “Advanced...” to open the “Color Correction” menu
- Select “No Color Adjustment” and press “OK”
- To avoid having to do all this each time you print, we recommend saving a Preset. Press
the “Add/Remove Presets...” button, give the preset a name, choose an icon and then click Save. - You will also usually want to print your images mirrored, so you should check the “Mirror Image” box on the next tab.
- Turn off “High Speed” if you’re having issues with ink not drying quickly enough and causing “pizza wheel marks”.
Windows - Type 2 
- Select the “Advanced” tab.
- Select the appropriate media type.
(For sublimation, avoid using Plain Paper and select High Quality Plain Paper or Matte paper instead. Set the “Quality” to one of the two highest settings). - Under “Color Management”, select “ICM”.
- Once ICM is selected you will have the option to check the box labeled “Off (No Color Adjustment)”. Check the box.
- To avoid having to do all this on each print, we recommend saving a Preset. Press “Save Settings...“ to configure a new preset.
- Turn off “High Speed” if you’re having issues with ink not drying quickly enough and causing “pizza wheel marks”.
Windows - Type 3

- Select the appropriate media type.
(For sublimation, avoid using Plain Paper and select High Quality Plain Paper or Matte paper instead). - Set “Print Quality” to “Fine” or “Quality”.
- “Mode” should be set to “Off (No Color Adjustment)”.
- We recommend saving a Preset. Press the “Save/Del...” button to configure a new preset.
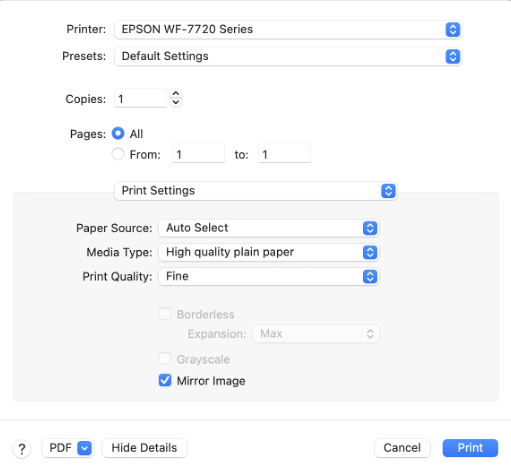
Mac - Type 4
- Select “File”-> ”Print…” from your graphics application. In this example, we’re using PhotoShop.
- Select the “Print Settings…” button under the “Printer Setup"

- The Print menu will appear and click the “Show Details” button if it has not been selected.

- You will see a dialog like below, but it may vary depending on your specific printer model.
- Check that the correct “Printer:” is set
- Select the preset that you made before, if applicable
- The first menu normally shows “Layout”. Click the side arrows to get to the following menus and settings (may vary by printer model):

-
Color Matching: Should be grayed out if you’ve told Photoshop to manage the color

-
Print Settings: Select the preferred paper type for your brand of paper and ink. It should be either “Epson Matte”, “Premium Presentation Matte” or “High quality plain paper”. Avoid using the “Plain paper” setting.

-
Color Options: Should show that the printer color management has been disabled.

v1.2 Nov 2021
<Return to the Custom ICC Profiles overview page>